Formatar datas e valores

Conteúdo
Este exemplo baseia-se no Exemplo com AbstractTableModel
Voltemos ao objeto Cliente, ele possui colunas do tipo data e valor.
Cliente
Primeiro precisamos alterar o construtor de cliente adicionando mais dados:
Cliente(int acodigo, String anome, Date adata, float asalario, Boolean atemcarro) {
this.codigo = acodigo;
this.nome = anome;
this.nasc = adata;
this.salario = asalario;
this.temCarro = atemcarro;
}
ClienteModel
Agora para exibi-los e formatá-los, vamos modificar o ClienteModel adicionando algumas linhas (atenção só estão exibidos os métodos alterados):
import java.text.SimpleDateFormat;
class ClienteModel extends AbstractTableModel {
public static final int COL_CODIGO = 0;
public static final int COL_NOME = 1;
public static final int COL_NASC = 2; // adicionamos mais constantes para colunas aqui
public static final int COL_SALARIO = 3;
public static final int COL_TEMCARRO = 4;
private static final int TOTAL_COLUNAS = 5; // agora são 5 colunas
private ArrayList<Cliente> clientes;
private String[] colunas = {"Código", "Nome", "Nasc.", "Salário", "Carro?"}; // aqui também
// retorna o valor (para exibir na tela)
public Object getValueAt(int row, int col) {
Cliente cliente = clientes.get(row);
switch(col) {
case COL_CODIGO : return String.valueOf(cliente.getCodigo());
case COL_NOME : return cliente.getNome();
// note que para cada tipo de campo formatamos diferente:
case COL_NASC : return new SimpleDateFormat("dd/MM/yy EEE").format(cliente.getNasc());
case COL_SALARIO : return String.format("%,.2f", cliente.getSalario());
case COL_TEMCARRO: return cliente.getTemCarro()? "Sim" : "Não";
default: return null;
}
}
}
Principal
Por último alteramos o módulo principal:
import java.util.Date;
public class Principal extends JFrame {
// inicializa o frame
Principal() {
super("Exemplo grid");
setDefaultCloseOperation(JFrame.EXIT_ON_CLOSE);
initComponents();
setSize(600, 200);
setVisible(true);
}
public void initComponents() {
// matriz que conterá os dados
modelo = new ClienteModel();
modelo.add(new Cliente(1, "Junior" , new Date(), 100.20f, true));
modelo.add(new Cliente(2, "Flavio" , new Date(), 50.10f, false));
modelo.add(new Cliente(3, "Romeu" , new Date(), 1.99f, false));
modelo.add(new Cliente(4, "Mandarim", new Date(), 0.92f, true));
// cria tabela com modelo
table = new JTable(modelo);
// só permite selecionar 1 linha por vez
table.setSelectionMode(ListSelectionModel.SINGLE_SELECTION);
// coloca table num scroll
scroller = new JScrollPane(table);
// adiciona na tela (frame)
setLayout(new BorderLayout());
getContentPane().add(scroller, BorderLayout.CENTER);
// cria um botão com título "Add"
JButton btAdd = new JButton("Add");
btAdd.addActionListener(new btNovoListener());
JPanel panel = new JPanel();
panel.add(btAdd);
getContentPane().add(panel, BorderLayout.SOUTH);
}
// cria uma classe para adicionar um novo cliente na table
public class btNovoListener implements ActionListener {
public void actionPerformed(ActionEvent e) {
String s = JOptionPane.showInputDialog("Digite nome:");
if (!s.equals("")) {
modelo.add(new Cliente(table.getRowCount() + 1, s, new Date(), 100f, false));
table.setRowSelectionInterval(table.getRowCount()-1, table.getRowCount()-1);
}
}
}
}
Tela
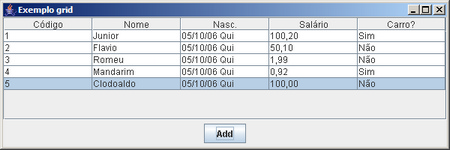
Note que os valores estão formatados (data, valor e boleano):
Veja também